Need traffic to your site? Why not have people “pay with a tweet”? People can get access to content on your site IF they “tweet” it out. Pretty interesting idea:
Monthly Archives: August 2011
TeleScrapbook
Teaching kids the basics of electronics and programming is something that I have been working on doing through my GadgetCamps. Â The GadgetCamps is 100% hands on. Â Hooking up circuits, typing in code, seeing how things work. Â There are many ways to make things “hands on”. Â The TeleScrap Book takes a unique approach. Â And it is Arduino based!
TeleScrapbook from Natalie Freed on Vimeo.
More information available from:
Running Windows Live Writer on Ubuntu
Windows Live writer is a blogging client that is just wonderful to use. Microsoft makes a lot of good software. We complain about it being buggy, too expensive, not open, etc. But there is a lot of value in Microsoft software.
Personally I use Ubuntu instead of windows and open office instead of Microsoft office. But the user experience on Windows and MS Office is much better than what I have been running. The thing about Ubuntu and Open Office is that they are free, good enough, and there is the potential of me actually getting in there an making some modifications and understanding the code. This is something that I hope to do. Also, my web host runs Linux and I thought it would be best to keep the OS the same (similar) between my web host and my desktop.
I have not found a blogging client that even comes close to what Windows Live Writer has in terms of ease of use. Especially when it comes to adding images to a blog post. I am currently using the WordPress admin screen to write this, and dealing with images is a pain, Pain, PAIN. Say, I want to insert a screen shot. I have to start my screen shot tool, save it as an image, upload the image, and insert it into the post. This is a 4 step process that can easily take a minute.
In Microsoft Live Writer, I take the screenshot, it is in my clipboard (don’t save it as a file), then paste it into the Live Writer. It manages the uploading and linking automatically. Plus I can easily re-size (great when dealing with the huge files from my camera), add effects like drop shadow, and add a water mark.
Well, now we got that out there… enough to start a flame war, let me get down to my journey of using Windows Live Writer on Ubuntu.
The solution to most problems begin with a Google search:Â “running windows live writer on ubuntu” should do it.
This brought me to: ubuntuforums.org/showthread.php?t=877972 where I can see that there are others that feel just like me:
Hi!
I want to use Windows Live Writer in Ubuntu, currently it is the only app due to which I have to go back using Windows. I have tried other Ubuntu blogging tools but none are as good as WLW. It is possible to run Office 2007 MS using Wine. Plz help me!
Ubuntu Linux Sound Problems – fixed – finally
(This is a journal about my journey to solve a problem with Ubuntu Audio. It is not a step by step problem solving guide. There are several mis-steps that I document, and there are surely better ways of doing this. Therefore, read through the entire thing and read the comments before taking any steps. And do only steps that you feel comfortable with.)
I did a fresh install of Ubuntu Linux last weekend on my desktop computer. I changed it from dual boot to being the only OS on the system. I plan to run any windows apps using WINE or in a OpenBox VM.
When my system was dual booted, the audio worked fine. After the re-install the audio has been causing me fits. (no doubt it is a different version, maybe I choose 32 bit the first time and this time I did a 64 bit install and perhaps it is using a different driver, or maybe there has been a release since the last time that I didn’t notice).
After doing some searching, I found this command line tool “ubuntu-bug”. Just go to the command line type in:
unbuntu-bug – audio
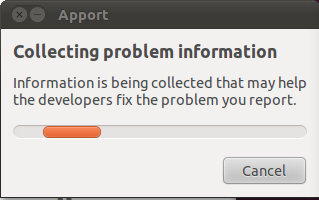
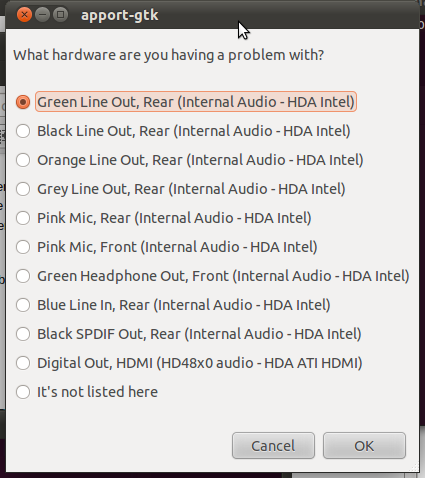
This will bring up a set of screens to help you resolve the problem:
Make sure you have a speaker or head phones hooked up to the port that you select. Then Click OK.
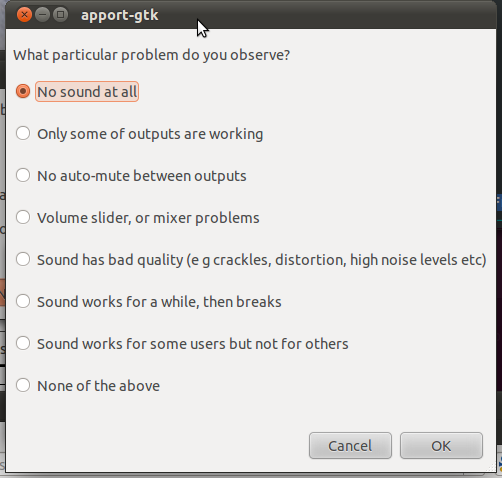
Now it will ask you what the problem is.
In my case, I chose “No Sound At All” and hit OK.
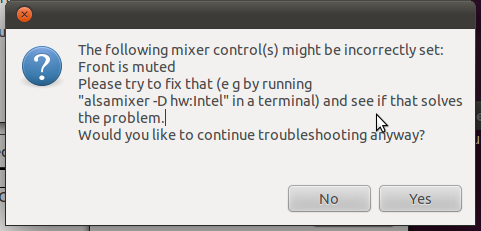
At this point hopefully you get some useful information like I did.
Now I open another terminal and type in the suggested command.
alsamixer -D hw:Intel
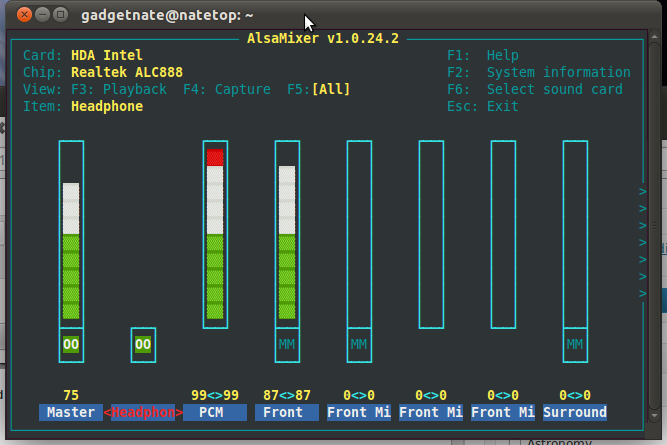
That brings ups a text based graphical interface. (Is that a contradiction in terms? text based graphical?)
Navigating this screen can be a bit tricky. Use the left and right buttons to change the channel that you are working with. It will be highlight in red font at the bottom. Notice “Headphon” (short for Headphone) is currently selected in the picture above.
My problem is that the “front” channel is currently muted. This is indicated by the “MM” in the box above “Front”.  Press the right arrow two times selects it. pressing “m” on the keyboard un-mutes it. Pressing a number between 0-9 will change the volume for the channel.
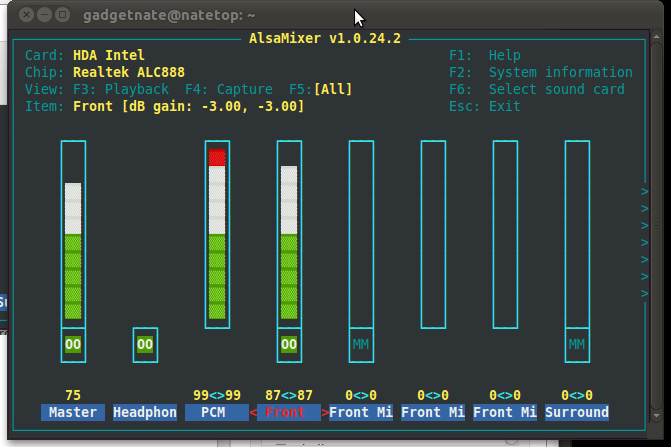
At this point my audio works, and I am very happy. (OK.. maybe happy isn’t the right word… relieved.)
That is until the next reboot. Then the audio doesn’t work, and I have to go through these steps again.
Doing a little searching on Google brought me to this post: ubuntuforums.org/showthread.php?p=8084515
Typing in this command as directed, did not solve the problem:
/sbin/alsactl restore
However, when the computer restarted and the audio was muted, I only had to type in “/sbin/alsactl restore” to get the audio turned back on.
I thought the idea of adding it to a startup script would be good, but I do not have a “~/.fluxbox” directory, so the suggestion in that post was not useful.
Reading on down to the last post provides a link to another post with a better solution:
ubuntuforums.org/showthread.php?p=8342636#post8342636
The only problem with this is that I do not have a /etc/init.d/alsa-utils file.
Reading the posts above that seem to point the way:
- Run ‘alsamixer’ in the Terminal
- Get the settings where you want them and press Esc to exit
- Run ‘sudo alsactl store 0’ in the Terminal
- Run ‘sudo gedit /etc/rc.local’ in the Terminal
- Add “/sbin/alsactl restore” to the end of that file and save it
- Reboot and test the results!
I rebooted, and nothing happened!!! But typing that added line in a terminal did restore my audio. Then my eyes fell on this comment in the rc.local file:
# In order to enable or disable this script just change the execution
# bits.
That can’t be it though doing a “ls -l /etc/rc.local” shows that it has execute permissions. Maybe my audio test was defective. Reboot and try again.
Nope, still no audio on setup. Maybe there is a typo in my /etc/rc.local file?
typing “/etc/rc.local” in a terminal to run it resolves the problem. So for some reason the rc.local is not getting executed….
The idea of adding it to the fluxbox init script doesn’t do me any good. I don’t use fluxbox… Googling for ubuntu startup scripts lead me to this page:
embraceubuntu.com/2005/09/07/adding-a-startup-script-to-be-run-at-bootup/
It seems that anything in the /etc/init.d directory gets ran on startup provided you follow some steps.
1) put the script in /etc/init.d
I did this by “cd /etc/init.d”
then “sudo vi sound-fix”
then insert the one line command in the file: /sbin/alsactl restore
Saved it.
2) add execute permissions
sudo chmod +x sound-fix
3) run “sudo update-rc.d sound-fix defaults”
Now lets give a reboot another shot…
Success!!!
If you have found this post useful, then please leave me a comment. If you know of a better way of doing this, or a good resource to turn to when solving problems like this, please leave a comment for that too.
Super Awesome Sylvia shows the LOL shield for the Arduino
Second week of GadgetCamps
Last week we had 6 middle school students at our first GadgetCamp. That was just the perfect number of students for the space at the Mathnasium that we are using.
The kids learned many things. How to identify the parts in their kits such as the Arduino microcontroller board, the usb cable, LEDs, resistors, wires, prototyping breadboards, peizo speaker, and buttons. They also learned to identify the parts of the Arduino board such as the usb connection, power connection, the digital pins, the analog pins, gnd pins, 5V pin, reset button, etc.
Then we go through the process of hooking up the Arduino to the computer and downloading the sample “blink†sketch. (Sketch is what an Arduino program is called in the Arduino world.) This is usually where we run into some time consuming problems due to different versions of windows, issues with the FTDI driver (FTDI makes the chip that is used to create the USB to serial connection used on the Arduino board), and issues with identifying the COM port that the Arduino is actually using.
Once passed, that we go through the blink sketch that turns on and off the 13th pin/connection on the board. This pin has its own LED built on the board. The blink program introduces a lot of new concepts and symbols that we go over. We learn about comments (/* */ and //). Learn about the two functions that must be defined in an Arduino program (setup() and loop()). We mention that the void in the function declaration is required, but that understanding about return types of functions is something that will not be covered in this camp. The purpose of the () is mentioned, but it is not expected that this is fully grasped at this stage. We also talk about the need and purpose of {}. And we point out how every statement has to end in a ;.
In the Blink sketch we go over the pinMode, digitalWrite, and delay functions that are used. Then we begin altering the blink program. What happens if you comment out the first delay? The light never comes on. Why? What happens if you comment out the second delay? The light never goes off. Why?
Challenge: Can you make the light stay on for twice as long as it is off? (Solution: Change delay interval after the digitalWrite(13, HIGH); to be twice as much as the digitalWrite(13, LOW);)
Challenge: Can you make the light blink one time long and then one time short? (Solution: Copy and past the 4 lines of the blink program and alter the delay times.)
From here we can move into Morse code and start sending out SOS and their initials.
Next we switch gears and learn about the prototyping breadboard. The most difficult part is understanding how the breadboard is connected. I have some better explanations and demonstrations planned for next week. And I think one thing that will help is to have better visuals to use in class. A cut away of the board would be useful. To the students, the prototyping breadboard looks like a grid of holes. The idea that some are connected together in a certain way is something that will take experience working with the prototyping breadboard to fully grasp.
Next we hookup a wire from the GND pin on the Arduino to the connection running on the side of the prototyping breadboard and a connection from the 5V to the connection running on the other side. Then we try hooking up our first LED and resistor. Here it is very, very important that the cathode of the LED (the shorter pin) to the ground side, then use a resistor (200 ohms) to connect to the anode of the LED. Then the resistor goes across the middle and hooks up to the other side of the prototyping breadboard. Then we take a wire to connect the resistor to the 5V connection on the side. Then the LED glows. During this process I explain that the LED will only work one way. The shorter pin has to be hooked up to ground. The longer one has to be hooked up to V+. I have them switch around the LED to demonstrate that it will not work the other way around.
The reason it is important to hook it up in this fashion is that it only takes removing the wire from the 5V+ connection and reconnecting it to an Arduino digital pin to have the Arduino control the light. At this point we usually go and connect multiple LEDs. This week I gave everyone red, yellow, and green LEDs to allow them to create a traffic light. All three are hooked up on the breadboard, and then we connect them to the Arduino. Pins 13, 12, 11. Then they have to modify the blink program by adding two pinMode lines and then the necessary delay and digitalWrite lines to make the lights blink like a traffic light. In the class this week we had an additional challenge of having two sets of traffic lights and to make them come on just like a real traffic intersection. They did a really good job.
Also, at this point we have them hook up as many lights as they want and create a pattern of blinking lights.
Now we switch gears again and begin working on constructing our electronic dice. For the case we have a cardboard box. They draw two squares on it and 7 circles in each square for the places that the LEDs need to go. Then using a tack they put two holes in each circle for the leads of the LEDs to go through. Then they put the LEDs in the cubes. I have a selection of LEDs that they can choose from. Green was the most popular color this week.
They put in the 14 LEDs for their dice, then bend the longer lead of the LED (the anode), to hold the LED in place and to make it easier to identify the cathode (shorter lead) which all need to be connected together. I have precut black wires for them to use and to connect using a wire wrapping tool. They connect all the cathodes together.
Then I have them connect a long wire that is either red, yellow, or white (I’ve gone through many spools of wire…). They connect this to the anode. I also have them remove the cover for the adhesive on the small prototyping breadboard to have it attach to the bottom of the box. Then they connect all the wires to this. This will then have the resistors and then the connection to the Arduino. The idea is to make it easier to connect and disconnect the Arduino from the electronic dice so that they can use it another project.
The wire wrapping is the end of the first day. The first camp we were mostly done with wire wrapping the first day. This week it took a lot of time. We ended up doing a lot of wire wrapping the second day too.
On the second day, we checked to make sure all the lights came on. We learned about creating our own functions. Started with just creating the “dot†and “dash†function for their Morse code program. We also covered variables, == comparison, the “if†statement and the “random†function. In the first week we also covered the piezo speaker and the tone function. This week, we barely mentioned it yesterday. Also, in the first camp we had the button hooked up on day two. We have not gotten to this yet.
This week, we have a lot of ground to cover on the final day of camp. I write some more about it later.
It is great to see how smart these kids are. I want to find some way to keep them motivated and making progress. For these reason, I am setting up monthly meetings for a “Electronics and Robotics Club†at the Barbara Bush Library. I’ve created Facebook events for the meetings. You can go there to find out more:

