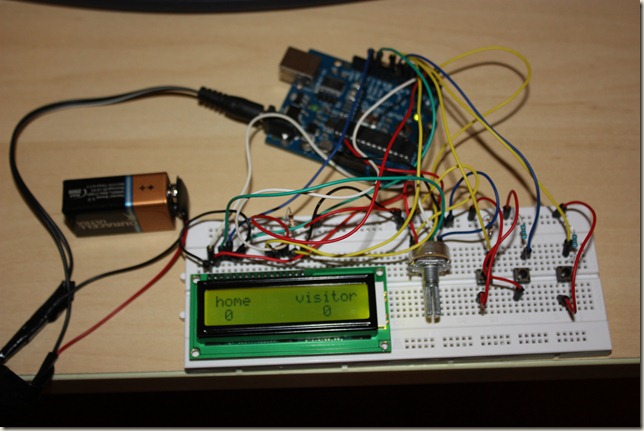
The Arduino microcontroller board has got to be one of the coolest things to come along. If you ever wanted to create simple gadgets and devices without that much hassle, then this the board to get. You can hook it up to your computer using the USB port, program in a simple C language, download the code, and away you go. You can use it to create controllers for your games, lights for your Christomas tree, loggers for your garden, monitors for your rooms, and controllers for your robots. All you need is a little patience and imagination (access to Google helps too 🙂 ).
Today, I want to share with you a little project that we created. It is a simple scoreboard. It took us about 20 minutes to put together, but that is because we were just learning and didn’t know much.
We started out by finding this example on how the LCD panel works: www.arduino.cc/en/Tutorial/LiquidCrystal
Then we hooked up some buttons, added some variables, created several iterations between our code.
Start off displaying the “Hello World†message in the LCD example. Then had added a “homeScore†variable and displayed that. Then added the Home Button. And tested to see if it was “highâ€, i.e. “on†in our code. Our first version of the code did not have the “delay†commands, and pressing the button one time caused the score to increment by 50-120 points. This was because the loop would have that many cycles before the button was brought back “lowâ€, i.e. “offâ€. Adding the “delay†kept this from happening. Then did the same thing for the visitor button. Required some experimentation with the lcd.SetCursor command to get the visitor scores to show up in the right place. Then added the reset button and set the scores to 0 when it was pressed. Ran into the problem that if the score had become two digit, then the 0 was only over writing part of the digits. Decided to “clear†the display completely on reset, which resolved the problem. Then cleaned up the code a little, and this was the results:
Code (based on LCD example: www.arduino.cc/en/Tutorial/LiquidCrystal )
/*
Simple ScoreboardShows a simple Home/Visitor scoreboard
*/
// include the library code:
#include <LiquidCrystal.h>// initialize the library with the numbers of the interface pins
LiquidCrystal lcd(12, 11, 5, 4, 3, 2);int homeScore;
int visitorScore;
const int buttonHomePin = 6;
const int buttonVisitorPin = 7;
const int buttonResetPin = 8;
int buttonState = 0;void setup() {
// set up the LCD’s number of columns and rows:
lcd.begin(16, 2);
// Print a message to the LCD.
setupScreen();
}void setupScreen()
{
lcd.clear();
lcd.setCursor(0,0);
lcd.print("home visitor");
homeScore = 0;
visitorScore = 0;
}void loop() {
buttonState = digitalRead(buttonHomePin);
if(buttonState == HIGH)
{
homeScore++;
delay(500);
}
buttonState = digitalRead(buttonVisitorPin);
if(buttonState == HIGH)
{
visitorScore++;
delay(500);
}buttonState = digitalRead(buttonResetPin);
if(buttonState == HIGH)
{
setupScreen();
}
lcd.print(homeScore);
lcd.setCursor(12, 1);
lcd.print(visitorScore);
}


Hello – I am looking to build and program a baseball scoreboard using an Arduino Uno microcontroller, much like what you have here, but with slightly more complexity. Instead of buttons to add runs/points to home or visitor score, I would like buttons to represent base hits which move baserunners (indicated by LED) around and appropriately add runs to the score using internal logic. I took a graduate-level mechatronics class so I have some limited familiarity with programming, but I would love help!
Thanks,
Brian
Hi, what potentiometer was used?
hi how do u know how to put in the wires